Cupola Installation Instructions and Tips
Roof Cupolas are mostly installed for looks, but sometimies, to provide an additional ventilation in your attic.
The very first step in any cupola installation is determining & purchasing the right size of cupola. Unfortunately, there is no precise rule of thumb that you can follow to determine the size of cupola to install. Some cupola manufactures suggest to use 1"-1' ratio (1" of cupola per every foot of unbroken roof line). Other manufacturers suggest to use 1.5"-1' ratio. At the end, it's really up to each individual to come up with the right size of cupola that will look best on their roof. Keep in mind that on long roofs you will need to install 2 or more cupolas instead of one large cupola for best looks. See Tips & Suggestions on bottom.
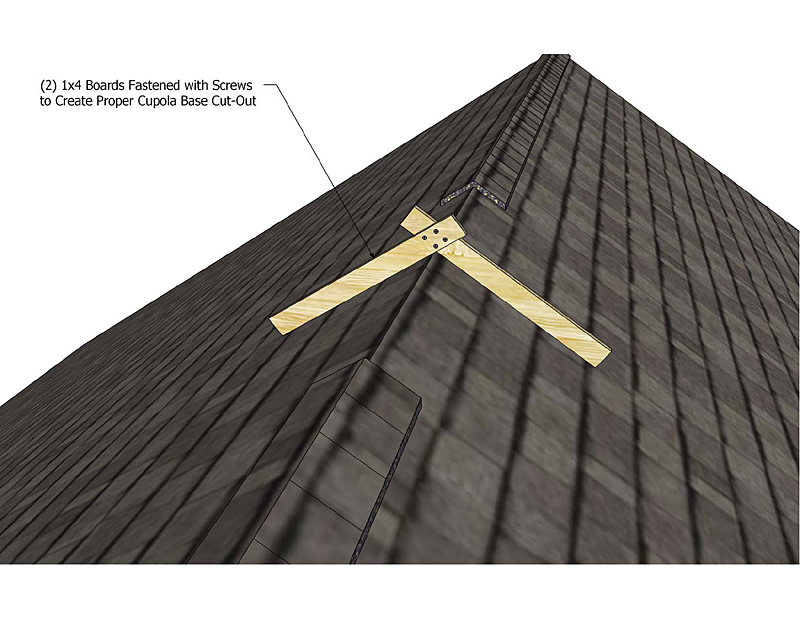
The second step in any cupola installation is to properly cut out your cupola base. To do this, you must first determine roof angle or make a pattern using two boards (as shown in this image).
First, remove ridge cap where cupola will be installed. Take two 1x4 boards, lay them on edge pushing them tight against your roof and fasten together. Use bottom of this pattern to mark cupola base on two sides. Cut the base with jig saw, circular saw or regular hand saw.
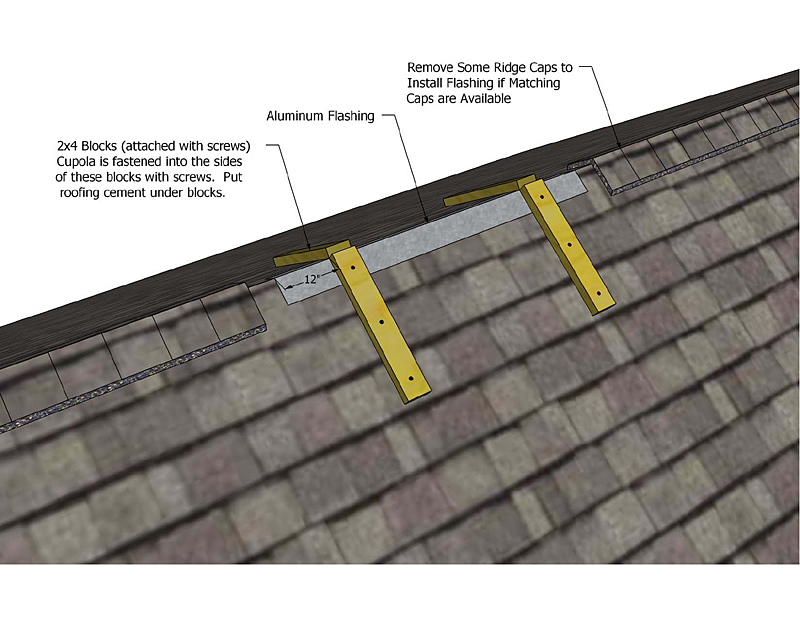
To prevent any leaks, installation of metal or aluminum flashing is recommended. Remove few extra courses of ridge cap (if new matching caps are available) and install flashing on roof ridge, so it's about 12" longer on each side of cupola.
Note: If you have aluminum ridge vent, cut out just enough, so cupola fits tight in between.
Measure inside of your cupola base and fasten 2x4 blocks so when the cupola is installed, it will fit snuggly over these blocks. It's a good idea to put some rubber cement under blocks before fastening them with screws.
Keep in mind that large cupolas can get very heavy. You will either need right equipment or two to four people to handle it and to put it up on the roof. Cupolas usually come in three parts (cupola base, center part with louvers or window & roof top). This makes it easier to handle them.
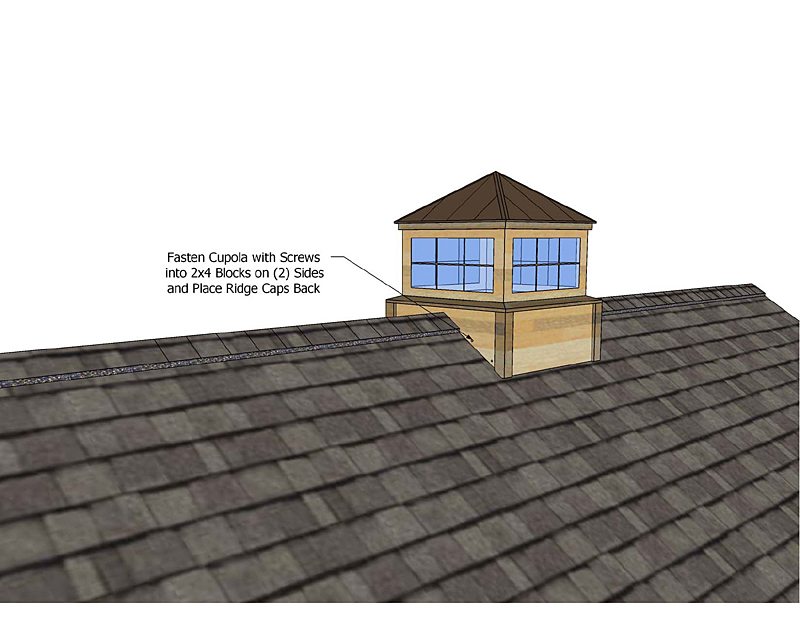
After your blocks are in place, put your cupola base on the roof and fasten with screws on both cut-out sides into 2x4 blocks. Install other parts of cupola and then finish your ridge with caps so they are tight against cupola sides. If flashing was properly installed, caulking might not be necessary, but is still good idea.
1. If you are planning to build a new barn or a house and to install a large size cupola on your new building, make sure your roof is designed properly and is built strong enough to hold extra cupola weight. Large cupolas (over 36") can be very heavy and will need extra support to hold its weight. If you are building your roof with rafters, double the rafters that your cupola sits on. If using trusses, install an extra truss to provide additional support.
2. To install functional vented cupola, you will either need to frame out opening or cut out hole in the roof. If cutting out the hole, make it 6" smaller on each side of cupola. For example, 36" square cupola will have 24" square hole. If framing out opening for cupola, make sure to use proper flashing to prevent any leaks.
3. To determine right size of cupola, look at different pictures or make few "up-to-scale" drawings and see what size looks best to you. From my experience, a 32" square cupola will look good on 24'x24' garage and 36" cupola will not look to bad on 36'x36' barn.